The Exposure Triangle Explained (With Real Photography Examples)

As you get more familiar with your camera, you’ll begin to experiment with Manual mode. When you do, it’s absolutely essential to understand the relationship between the three main elements that work together to make the exposure. The way to remember the three key ingredients is by a triangle that has aperture, shutter speed, and ISO on each side, known as “the exposure triangle”. Each setting you adjust, whether aperture, shutter speed, or ISO, affects how your image looks. I cover each of these settings in greater detail in my article, “11 Essential Canon Camera Settings (With Examples and When To Use Them)“, but in this article, I’ll just touch on the basics.
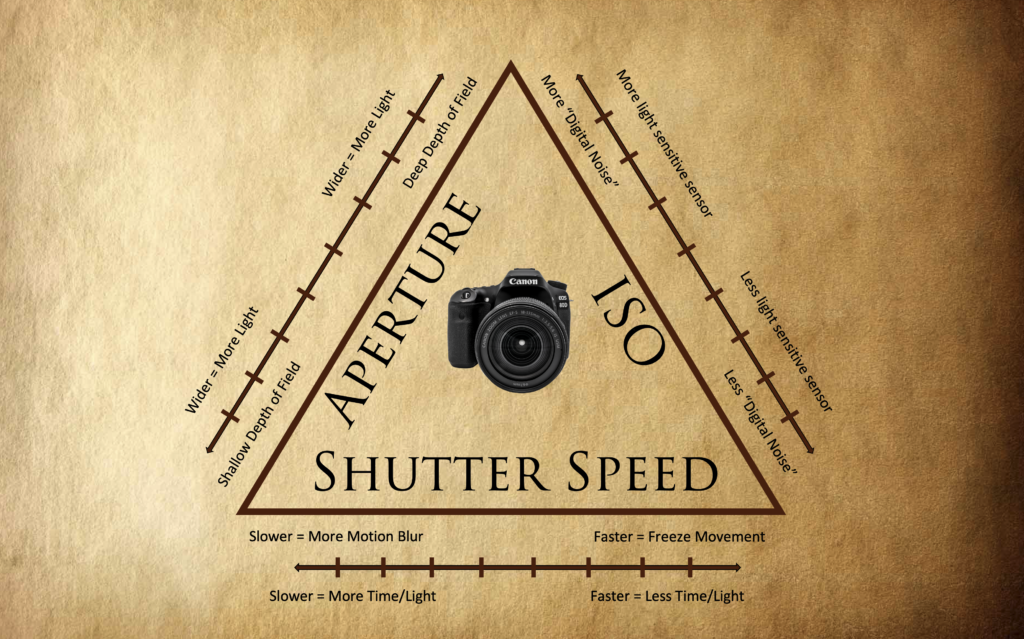
Remember, the key to creative photography is understanding how changing one side of the triangle affects the others. Let’s learn how aperture, shutter speed, and ISO work together.
Aperture
The first part of the exposure triangle that we’ll talk about is aperture. At its most basic, the aperture is simply the hole in your lens through which light enters your camera. It opens or closes to let in more or less light.
The aperture scale is measured in f-stops. There doesn’t seem to be “logic” to f-stop notation at first glance because it looks like a random string of numbers: f/2.8, f/4, f/5.6, f/8, f/11, f/16. Do you see the forward slash “/” in the notation? That’s a division symbol. If your aperture were capable of opening up completely, the ratio would be notated as f/1. As you close the aperture, the number represents a fraction of the size of the opening for light to pass through. When the fractions are small like f/16, the opening is very small. When the fractions get closer to f/1, the aperture opens wider. People often think “smaller” numbers like f/1.8, means the aperture should also be small. Remember it’s a fraction, and you’ll know which way to adjust the aperture to open and close it.
Depth of Field
In addition to letting in more or less light, aperture controls depth of field in your photos. Depth of field refers to how “in focus” your foreground, your subject, and your background elements are. When you close down your aperture (f/16 for example), more of your foreground, subject, and background will be in focus.
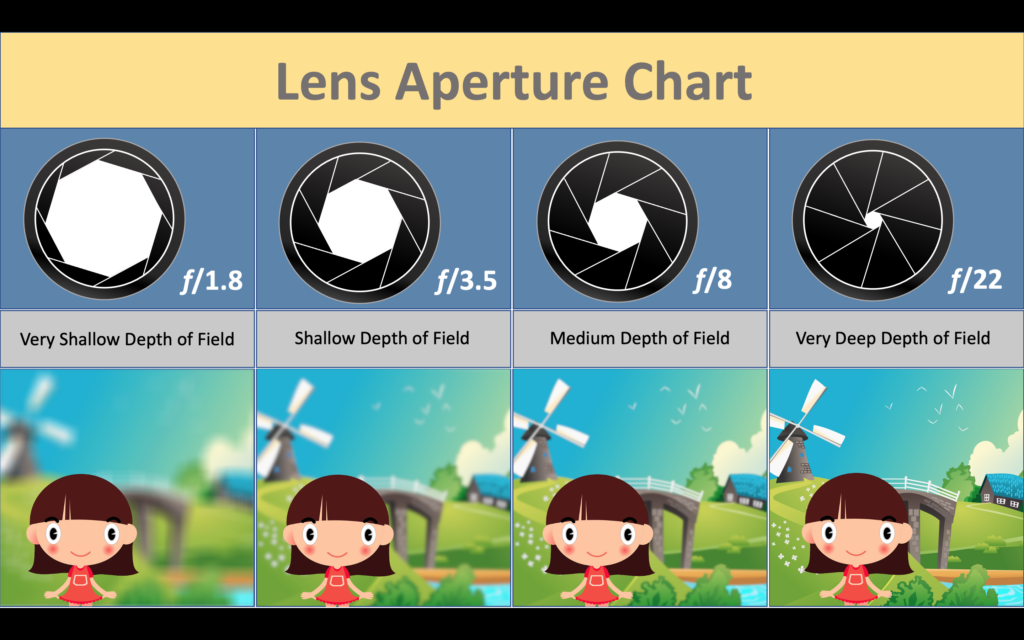
When you take photos with a wide open aperture (f/1.8 for example), your foreground and background elements are blurred, leaving only your subject in focus. Some lenses are capable of opening very wide (f/1.4 for example). Portrait photographers have to be careful when photographing people at very wide apertures, because the depth of field is so shallow that while a person’s eyes may be sharp, their nose and ears may become blurred.
Shutter Speed
The next setting on the exposure triangle is shutter speed. The shutter speed refers to the amount of time it takes for the shutter to open and close, allowing light to get to the sensor. Shutter speed notation is relatively straight forward, and is measured in seconds and fractions of seconds. For example, 1/8, 1/15, 1/30, 1/60, 1/125, 1/250 sec. The smaller the fraction, the faster the shutter speed.
Motion Blur
We use shutter speed to control how motion appears in our photos. If we want to freeze motion, we need fast shutter speeds (for example, 1/500th of a second or faster). If we want motion blur, then we use a slow shutter speed.
Sometimes beginner photographers get frustrated when their subjects appear blurry. That usually happens because the shutter speed is set too slow. Here’s a general rule of thumb to help overcome that problem: Set your shutter speed to roughly double that of your lens’s focal length. For example, if you’re zoomed in to 55mm, then don’t go below a shutter speed of 1/125. If you zoom in to 300mm, then set your shutter to 1/640, and so on.
ISO
Our final setting on the exposure triangle is ISO. ISO controls how sensitive your camera’s sensor is to light. It too is measured in f-stops, and doubles as it moves along the scale — 100, 200, 400, 800, and so on.
Low-Light Scenarios
So when should you adjust the ISO? Here’s a common scenario: When photographing a subject in low-light conditions, you might slow down the shutter speed to give light more time to get into your camera. But when you slow down the shutter too much, your photos turn out blurry. If you follow the rule of thumb from the previous paragraph and keep your shutter speed at roughly double your focal length, then photos appear too dark. The solution? Simply bump up the ISO a few ticks, and take a test shot. Repeat until you dial in your desired setting, and you’re good to go. The drawback to raising the ISO too much is that your images will begin to appear “grainy”. Experiment with it, and see how your camera does with different ISO settings.
Real Photography Examples
Example 1 – Freezing Motion
Problem: Blurry kids, pets, or sports shots
Fix: Increase shutter speed to 1/500+
Trade-off: Raise ISO as needed to maintain brightness
Example 2 – Blurred Backgrounds in Portraits
Problem: Busy, distracting background
Fix: Open aperture to f/1.8 – f/2.8
Trade-off: Reduce ISO or increase shutter speed to avoid over-exposure
Example 3 – Low-light Indoor Shot
Problem: Dark, under-exposed indoor photos
Fix: Increase ISO to 800-1600
Trade-off: Use wider aperture or slower shutter to minimize digital noise
Keys to Creativity
Every image taken with your DSLR or mirrorless camera is an equation of aperture, shutter speed and ISO. They have a reciprocal relationship with each other. For a given exposure if you increase one element of the exposure triangle by one stop, you’ll have to decrease one of the other parameters by a stop. For example, let’s say your camera is set to a 4 second shutter speed, f/16 aperture, and ISO 100, and you decide to reduce the aperture to f/22. You’ll now need to either increase the shutter speed to 8 seconds or ISO to 200 to compensate.
Always experiment. Not every photo needs to be a perfectly exposed “snapshot” of a scene. What if you want a bit of blur to denote motion, like a silky looking waterfall, passing cars as they zip by, or soft background movement?
That’s exactly where understanding the exposure triangle becomes so powerful. By adjusting shutter speed, aperture, and ISO together, you can intentionally create motion blur, or freeze action depending on your creative goal.


![How to Photograph Waterfalls [And Get That “Misty” Look]](https://kewltekphotography.net/wp-content/uploads/2020/04/IMG_0388-1-768x512.jpg)